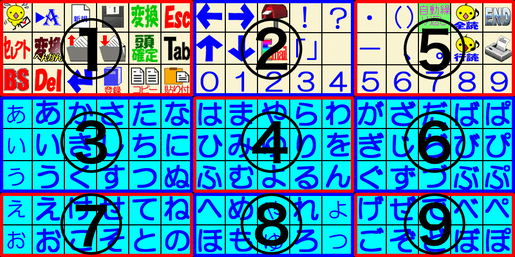
HeartyLadder 9分割モード用のスイッチを作成します。
9分割モードはジョイパッドの9つのボタンを使います。Arduino Leonardo をジョイパッドとしてパソコンに認識させ9分割モード専用のスイッチにします。しかし、Arduino Leonardo をパソコンに接続しただけではジョイパッドと認識しません。ライブラリを追加しコードを転送します。
スイッチは4分割モードと同じようにして、9つ配置します。
参考:instructables Arduino Leonardo/Micro as Game Controller/Joystick
ライブラリのインストール
- https://github.com/MHeironimus/ArduinoJoystickLibrary へ移動する
- 「Clone or download」→「Download ZIP」をクリックして圧縮ファイルをダウンロードする
- ダウンロードしたファイルを解凍する
- 解凍してできたフォルダの中に「Joystick」フォルダがあるのでこれらを ドキュメント > Arduino > libraries にコピーする
Arduino 開発環境を起動しライブラリが追加されたか確認します。
「ファイル」メニュー > 「スケッチの例」サブメニューに「Joystick」があればライブラリの追加は完了です。
コード
Arduino の1番ピン〜9番ピンがジョイパッドのボタン1〜ボタン9に対応します。
押しボタンスイッチの片方の端子を Arduino のそれぞれのピンと接続、反対側の端子をGNDと接続します。
HeartyLadder とジョイパッドのボタンは下図のような対応になります。ケースに押しボタンスイッチを配置する際はご注意ください。

以下のコードをArduino へ転送します。
// Simple example application that shows how to read four Arduino // digital pins and map them to the USB Joystick library. // // by Matthew Heironimus // 2015-11-20 //—————————————————————————————————— /* https://github.com/MHeironimus/ArduinoJoystickLibrary 上記のライブラリ、サンプルコードを利用しています。 */ #includevoid setup() { // Initialize Button Pins pinMode(1, INPUT_PULLUP); pinMode(2, INPUT_PULLUP); pinMode(3, INPUT_PULLUP); pinMode(4, INPUT_PULLUP); pinMode(5, INPUT_PULLUP); pinMode(6, INPUT_PULLUP); pinMode(7, INPUT_PULLUP); pinMode(8, INPUT_PULLUP); pinMode(9, INPUT_PULLUP); // Initialize Joystick Library Joystick.begin(); } // Constant that maps the phyical pin to the joystick button. const int pinToButtonMap = 1; // Last state of the button int lastButtonState[9] = {0,0,0,0,0,0,0,0,0}; void loop() { // Read pin values for (int index = 0; index < 9; index++) { int currentButtonState = !digitalRead(index + pinToButtonMap); if (currentButtonState != lastButtonState[index]) { Joystick.setButton(index, currentButtonState); lastButtonState[index] = currentButtonState; } } delay(50); }